
Objective
This SOP explains how to access the Messer FMO portal, download commission statements, and interpret the key fields on the statement. It also outlines how to use ComTrack Retrieve to automate statement collection and reduce manual work.
Key Steps
1. Access the Messer FMO Portal Homepage 0:07
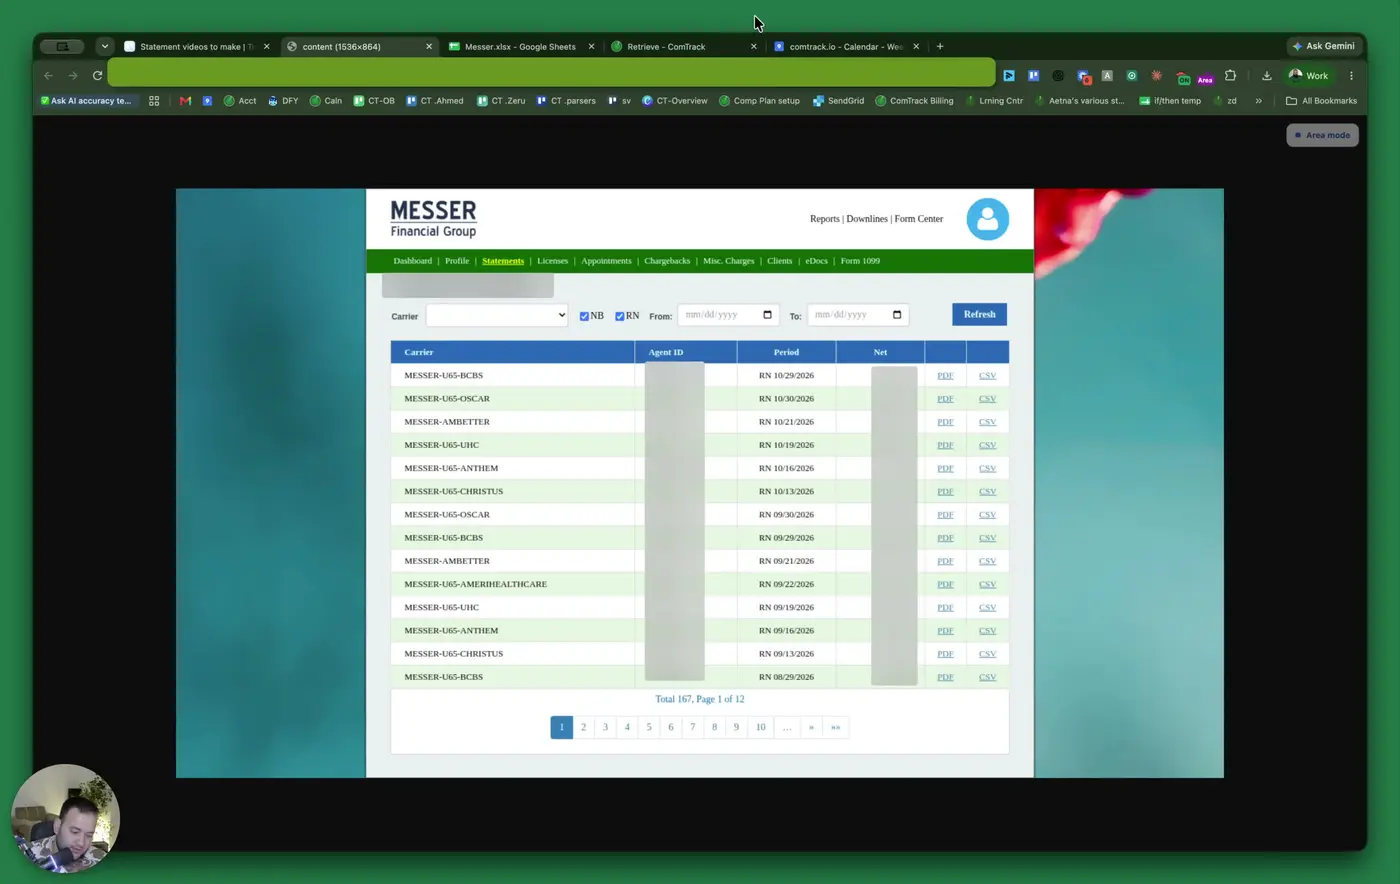
- Log in to the Messer FMO portal using your assigned credentials.
- Confirm you are on the homepage after login.
- Use the homepage as the starting point for statement access and review.
2. Open the Statements Section and Filter the Date Range 0:16
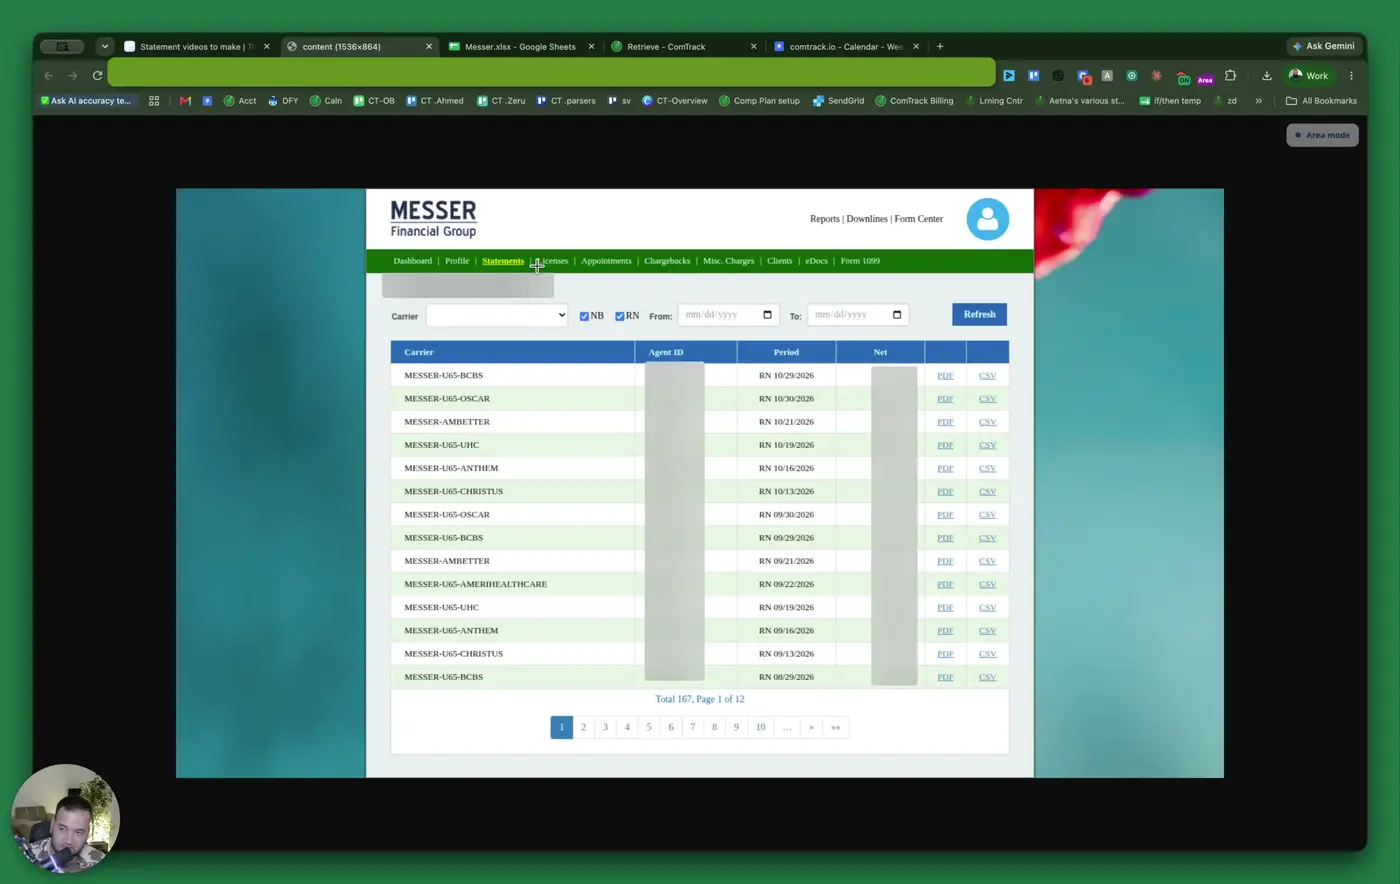
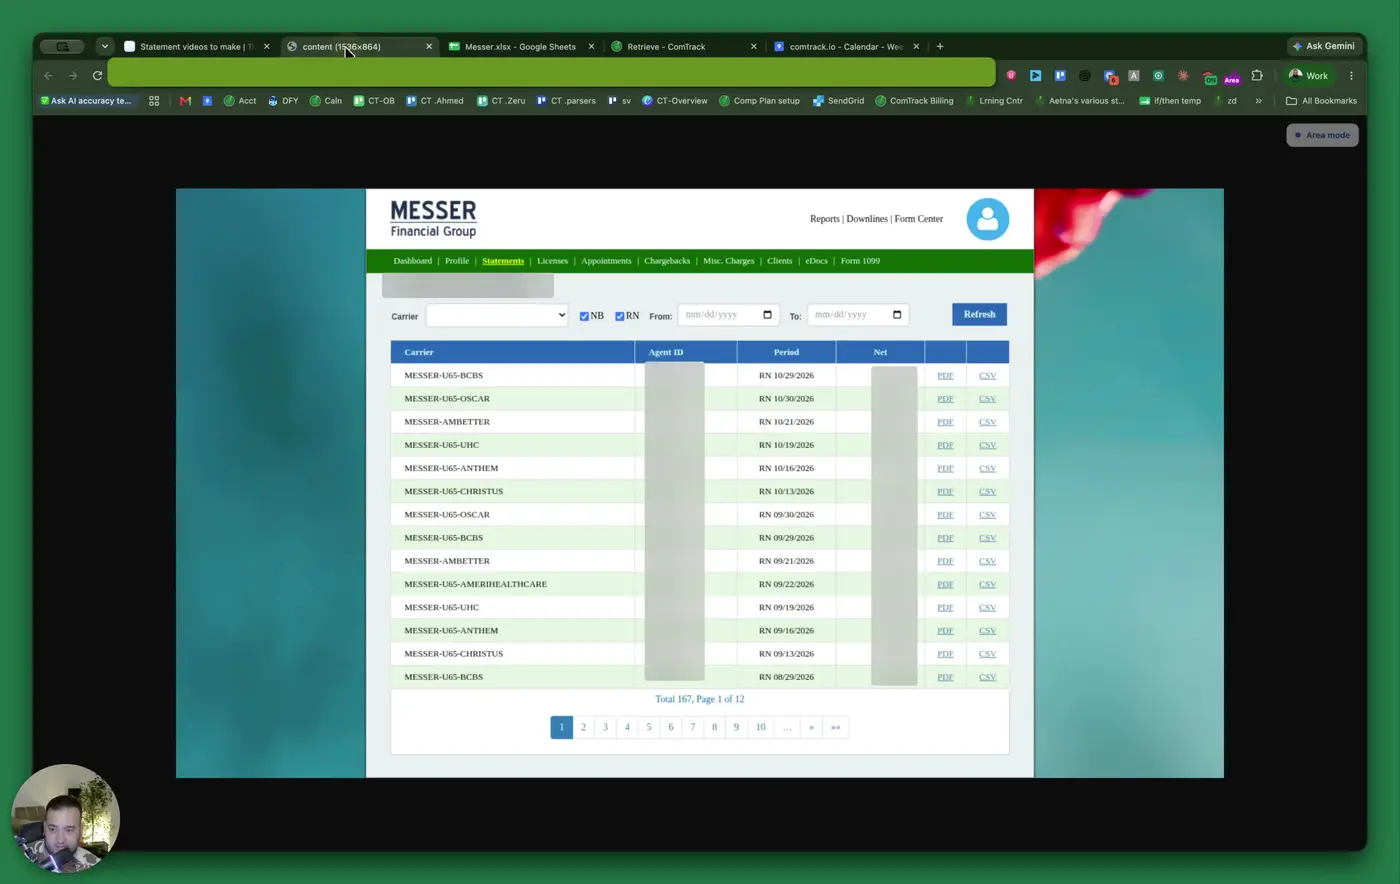
- Click Statements from the portal menu.
- Review all available statements in the portal.
- Leave the From and To date fields blank to display all statements by default.
- If you need a narrower result set, enter a specific From date and To date.
- Verify the list updates to show only statements within the selected time period.
3. Download the Statement File 0:42
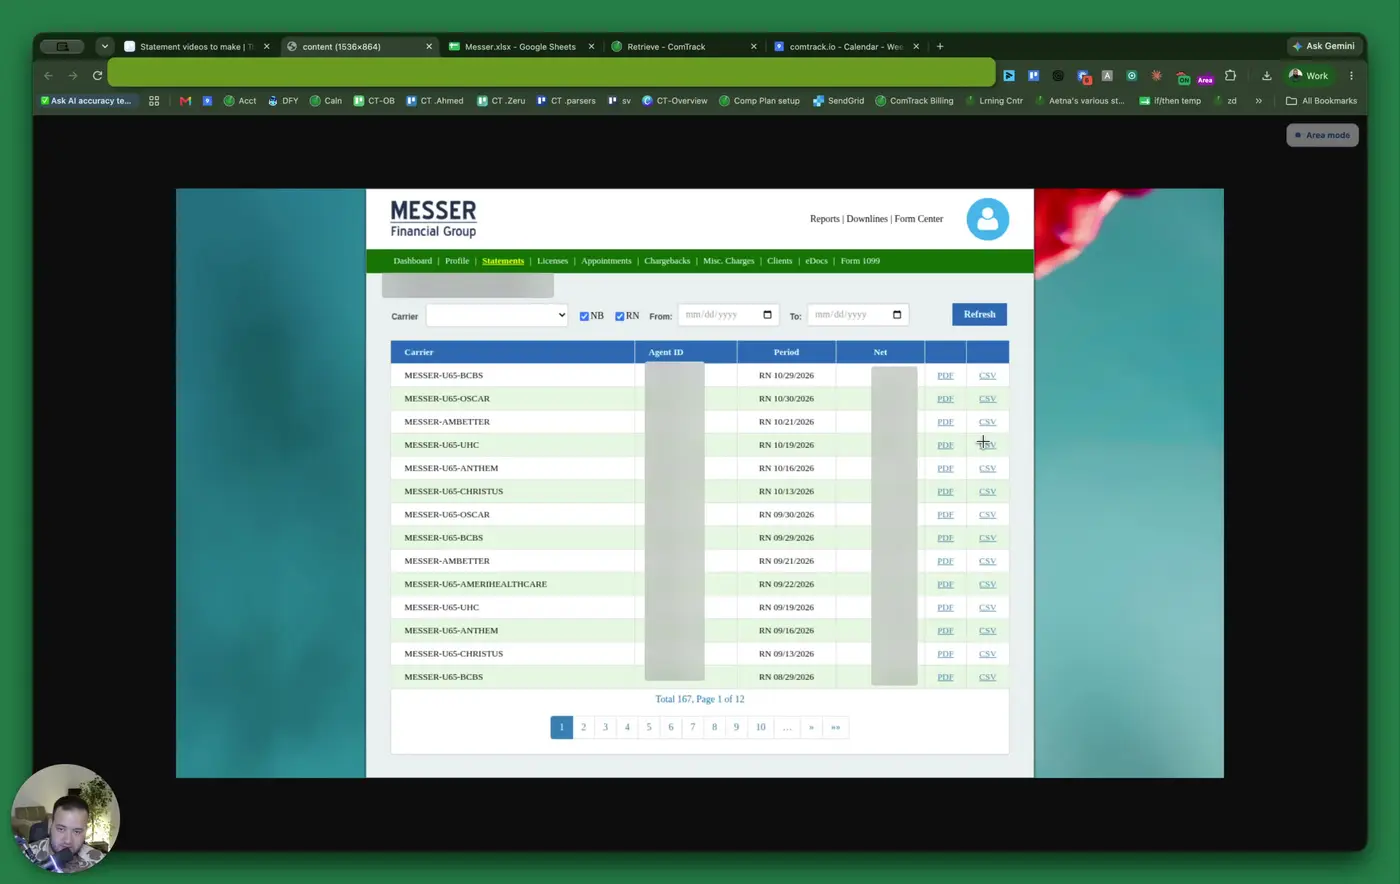
- Choose the file format you need from the available options:
- CSV
- Select CSV to download the commission statement.
- Save the file locally on your computer in the appropriate folder for your records or processing workflow.
4. Review the Statement Header and Core Identifiers 0:52
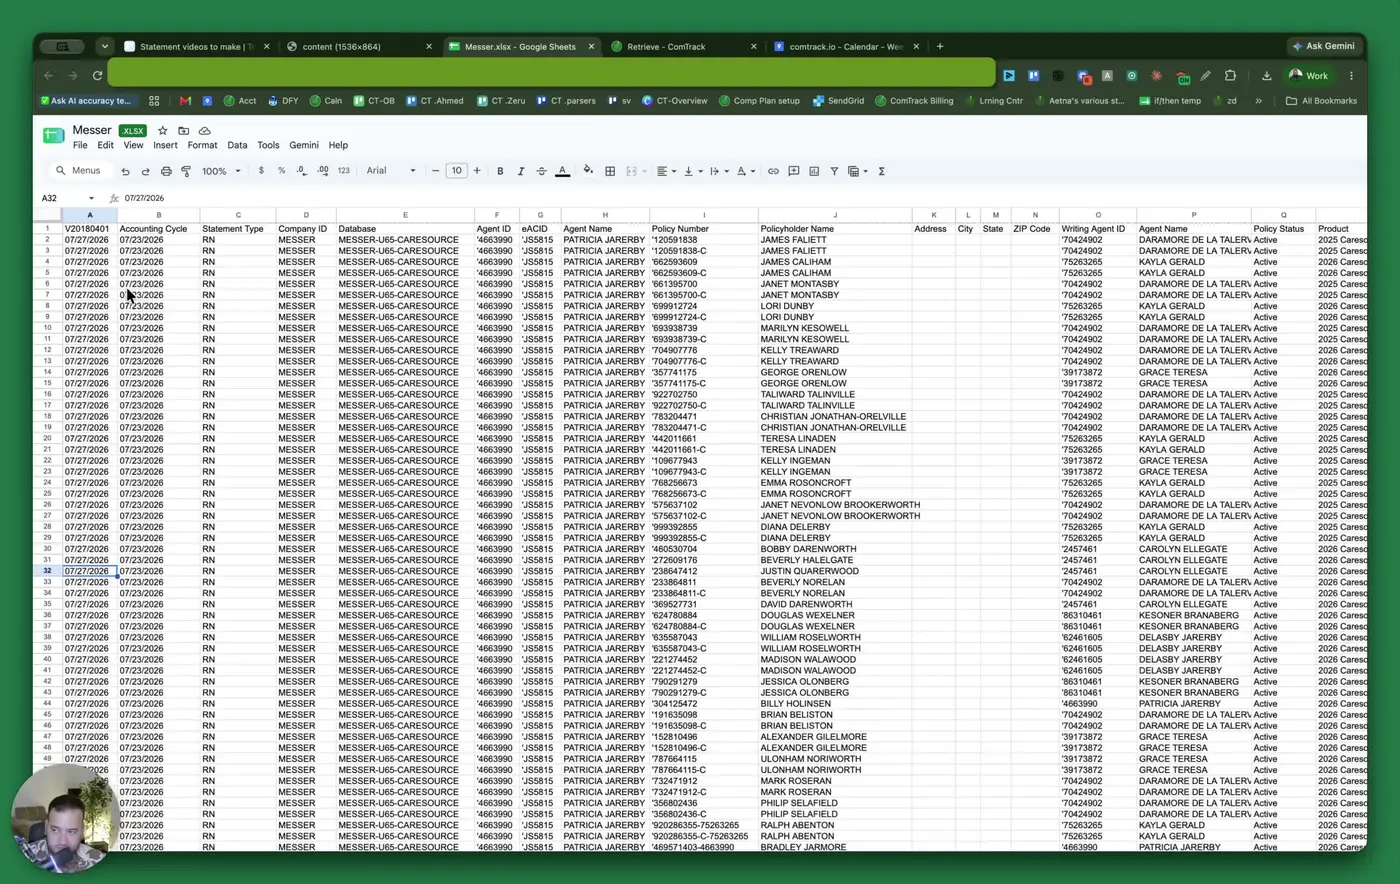
- Confirm the Statement From Date, which indicates the accounting cycle or pay period the statement closes.
- Check the Statement Type; in the transcript, A indicates renewal.
- Review the Company ID to identify the agency/FMO associated with the statement.
- Use the Database field to identify the book of business or pay-through carrier information.
- Locate the Agent ID, EACID, and Agent Name to confirm the writing agent tied to the statement.
5. Verify Policy and Client Information 1:59
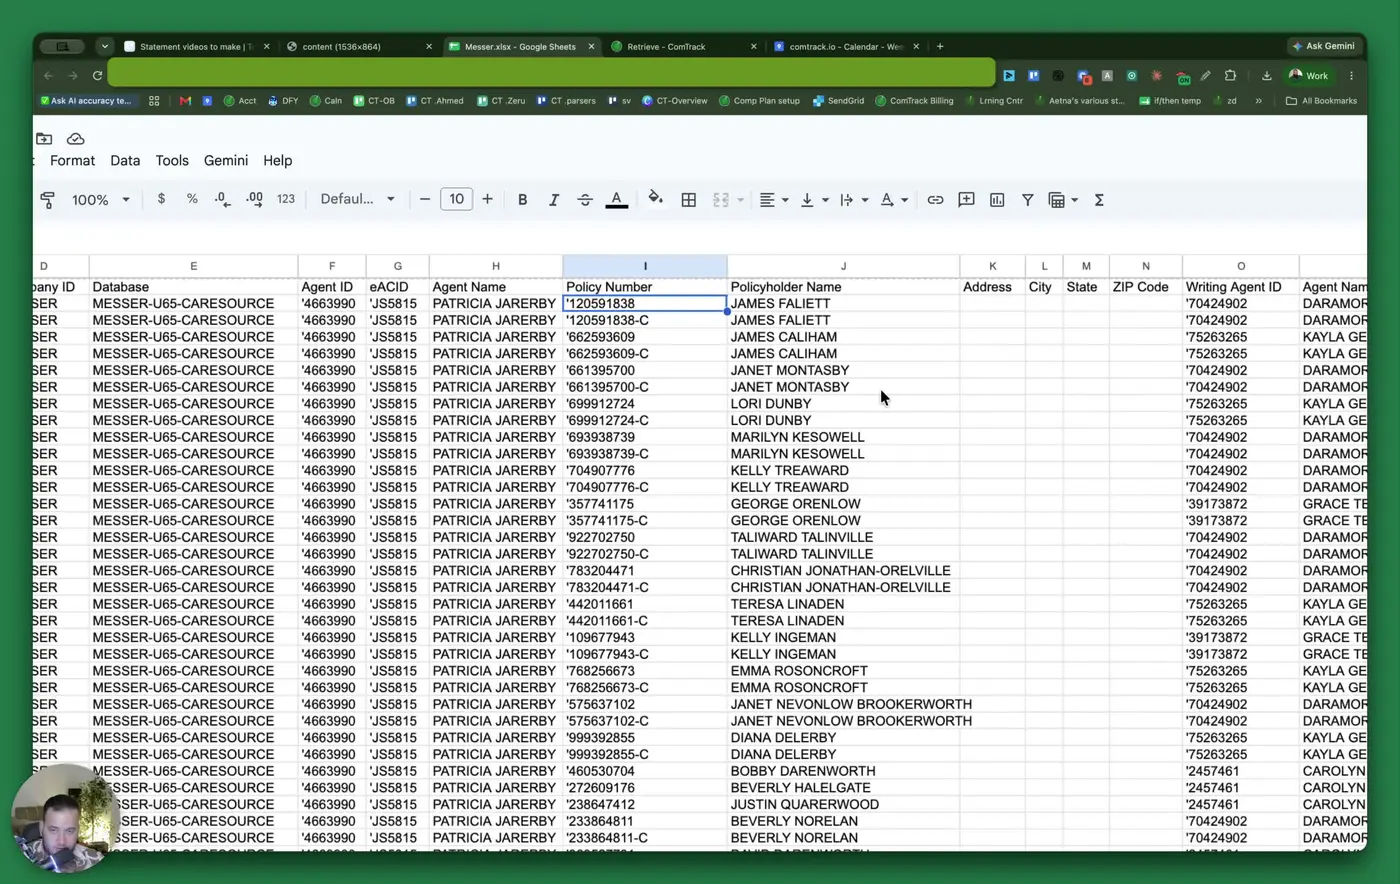
- Review the Policy Number for the specific policy record.
- Confirm the Policyholder Name to identify the client.
- Check the client details, including:
- Address
- City
- ZIP code
- State
- Review the Writing Agent ID and Writing Agent Name for agent attribution.
- Check Policy Status to determine whether the policy is active or canceled.
6. Understand Product, Coverage, and Payment Fields 2:12
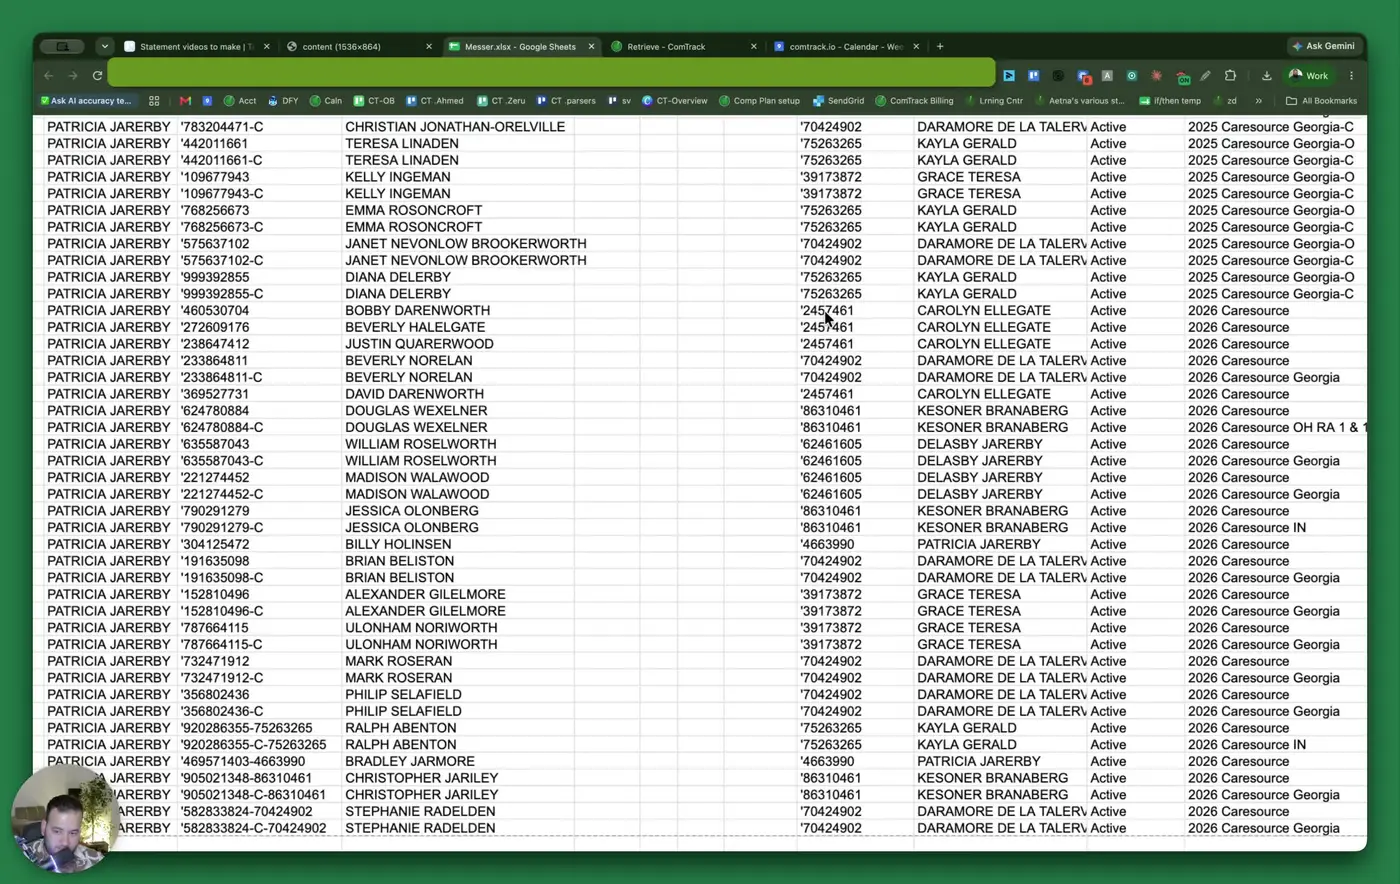
- Review the Product field to identify the plan year and carrier/product details.
- Interpret the transaction type indicators:
- O = Override
- C = Commission
- Check the Issue Date to see when coverage started.
- Review Pay To Date to confirm how far the client has paid coverage.
- Use Payment Mode to understand how often the client pays.
- Review Month Paid to determine how many months are covered by the payment.
- Check the Transaction Date to see when the payment was processed.
- Review the Pay Code as an internal Messer code.
7. Review Premium, Commission, and Adjustment Amounts 3:10
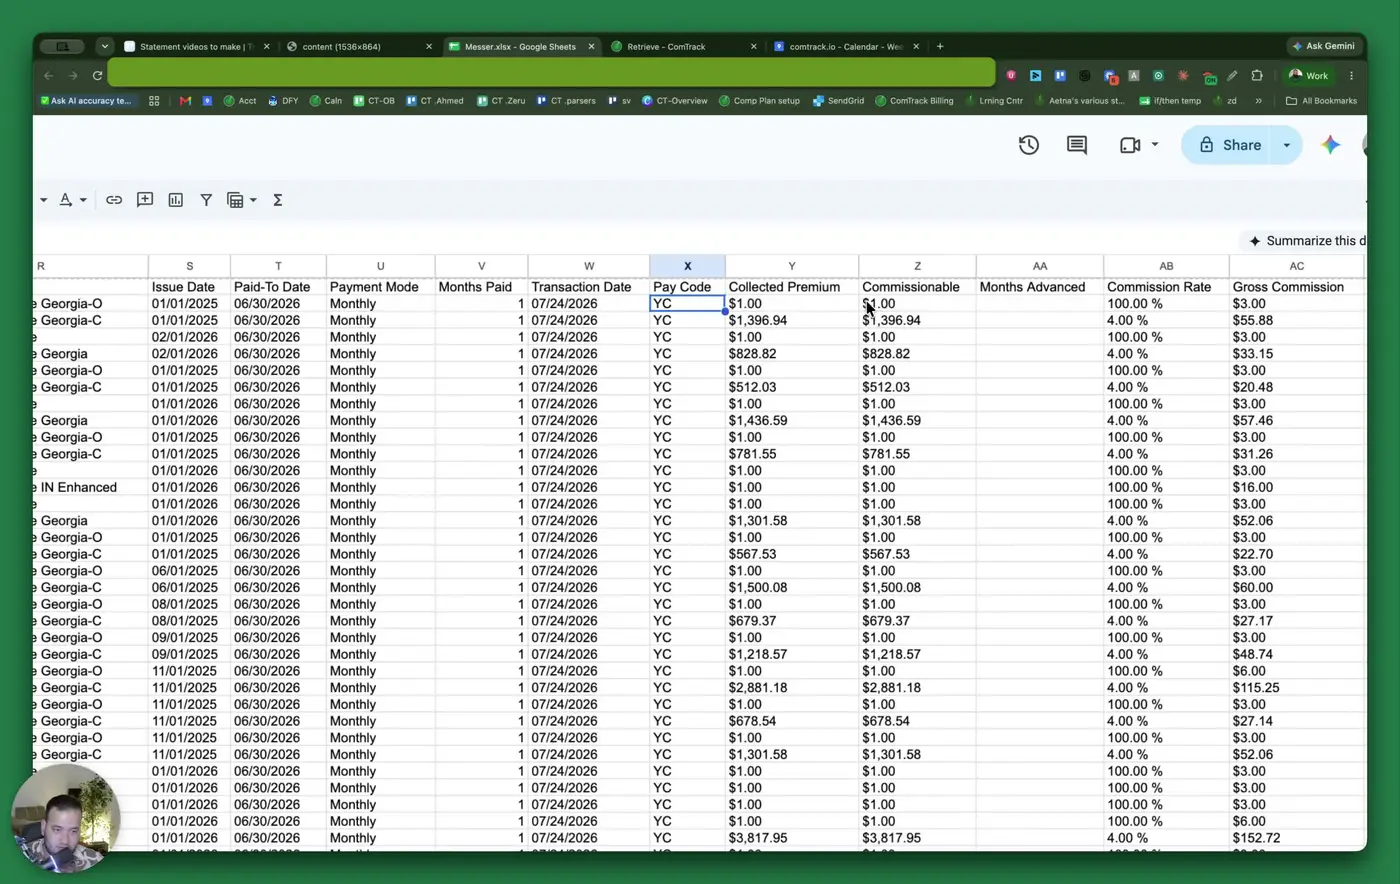
- Check Collected Premium to see the amount the client paid.
- Review Commissionable to identify the portion of premium eligible for commission.
- Check Months Advanced to see whether any months were paid ahead.
- Review Commission Rate and Gross Commissions to understand the commission before deductions.
- Check Escrow Rate and Escrow Amount to identify any reserve or holdback.
- Review Advanced Amount if any commission was paid in advance.
- Check Earned Credits to see the actual pay on the row.
- Review Earned Commission to confirm commissions earned against the transaction.
- Check Escrow Adjustments for any held-back or returned commission amounts.
- Review Chargebacks to identify any amounts taken back due to cancellations or reversals.
8. Use Transaction ID to Track Unique Rows 4:32
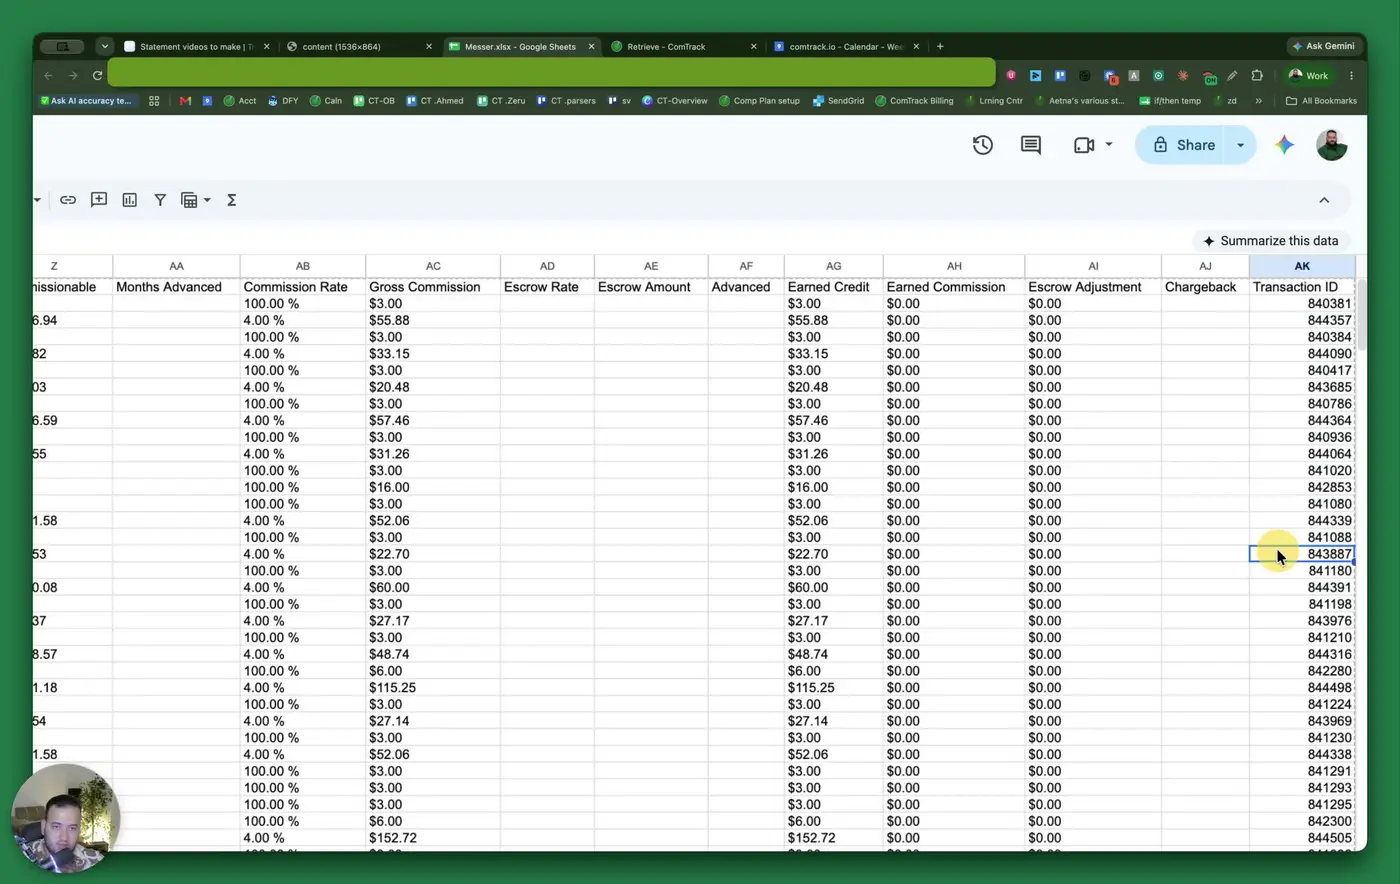
- Locate the Transaction ID for each row in the statement.
- Treat each row as a unique transaction record.
- Use the Transaction ID to reconcile or reference a specific payment entry.
- Confirm that no two rows share the same Transaction ID.
9. Set Up ComTrack Retrieve for Automated Statement Collection 4:59
- Open Retrieve in ComTrack to automate statement downloads.
- Search for Messer in the carrier/FMO list.
- Enter your Messer username and password.
- Select how far back you want Retrieve to pull files.
- Click Run to start the retrieval process.
- Use this method to retrieve Messer and other carriers at the same time if needed.
10. Schedule Automatic Monthly Retrieval 6:00
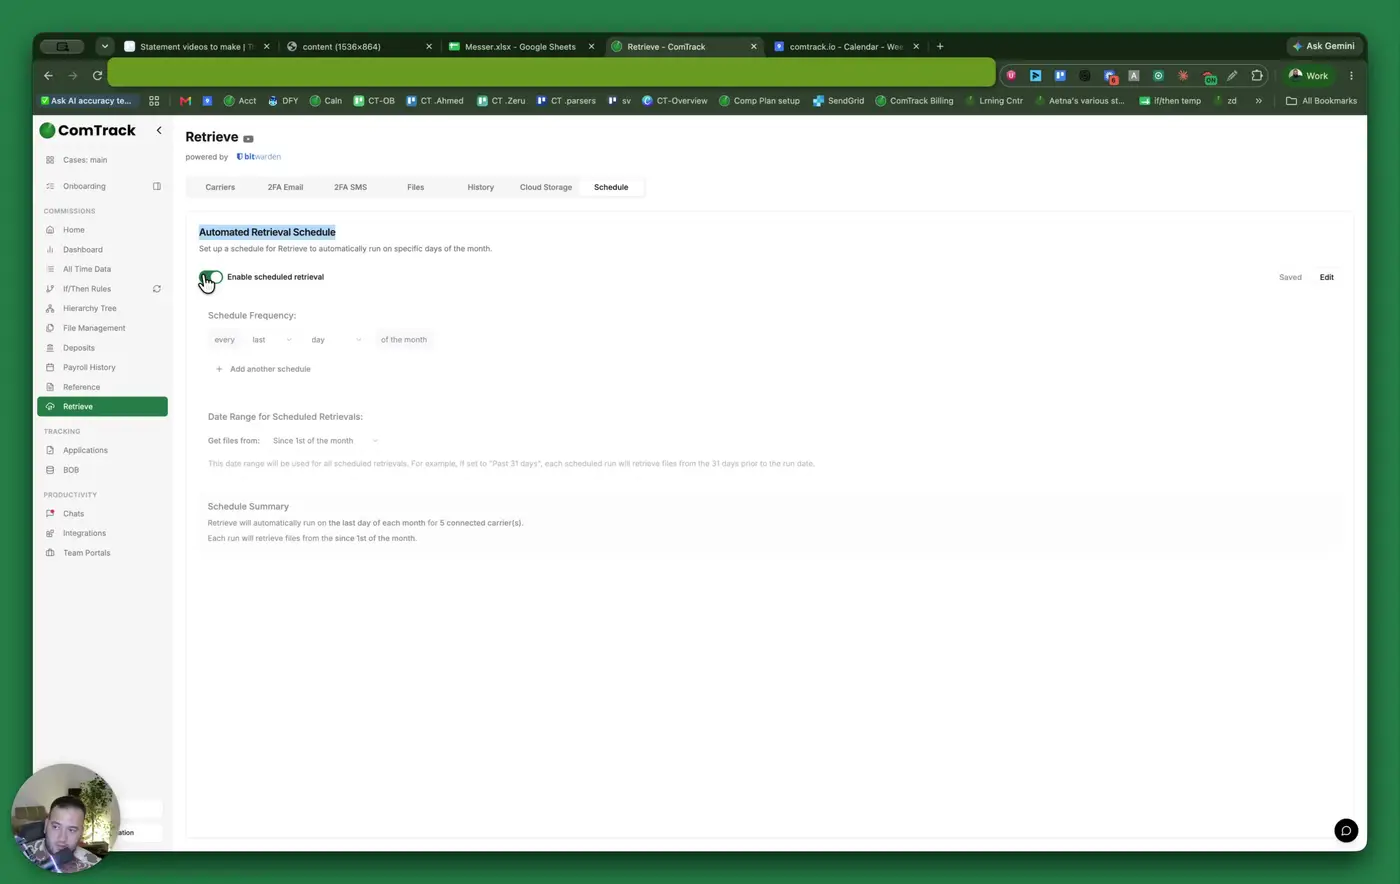
- Configure a Retrieve schedule to automate file collection.
- Set a time trigger, such as the first day of each month.
- Choose the prior month’s files as the retrieval target.
- Allow Retrieve to run automatically and upload files into ComTrack.
- Expect uploaded files to appear in ComTrack in about 20 minutes.
- Use the uploaded files and dashboard views to monitor all-time data and improve visibility.
Cautionary Notes
- Ensure you are using the correct Messer login credentials before attempting to download statements.
- Be careful when applying date filters; leaving them blank returns all statements, which may be more data than intended.
- Confirm the file format before downloading; CSV is preferred for data processing, while PDF may be better for viewing.
- Statement fields such as O, C, Escrow, and Chargebacks are internal accounting indicators and should be interpreted consistently.
- Verify that each transaction row has a unique Transaction ID before using the data for reconciliation.
- When setting up Retrieve, confirm the username/password and date range to avoid missing files or pulling the wrong period.
Tips for Efficiency
- Use the CSV download option when you need to sort, filter, or reconcile statement data.
- Leave date filters blank only when you need the full statement history; otherwise, narrow the range to save time.
- Use ComTrack Retrieve to eliminate repetitive manual downloads.
- Add multiple carriers to Retrieve at once if your workflow includes more than Messer.
- Schedule Retrieve to run automatically on a recurring basis, such as monthly, to reduce manual follow-up.
- Check ComTrack about 20 minutes after the scheduled run to confirm files have uploaded successfully.